
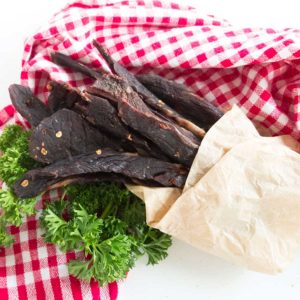
The best spicy beef jerky recipe that can be made at home with or without a dehydrator. Oven beef jerky can be scary but I promise it is so easy using my step-by-step guide! For this one we are doing chili lime beef jerky, the marinade is gluten-free and refined sugar free but so flavorful.

WANT TO SAVE THIS RECIPE?
This post may include affiliate links. Please read my disclosure policy.
Jump to:
We have been busy this summer traveling and hiking. Which means I need snacks! We rely on a set list of go-to gluten-free travel snacks. For me, that means almonds, bananas or apples and gluten-free beef jerky! Specifically, this totally awesome oven dried Chili Lime Beef Jerky. Totally portable and big on flavor.
Trust me. No dehydrator needed, no special equipment. Just your oven and a wooden spoon. Store-bought beef jerky gets expensive, especially when you are looking for organic grass-fed AND gluten-free.
I wait for the right roasts to go on sale and then I load up for the summer. Plus, I like to tweak my marinade, sometimes I want a little sweet but without the sugar, and sometimes I want extra spicy, or BBQ or more citrus. But this is my number one go to beef jerky recipe.
The Best Chili Lime Beef Jerky Marinade
The perfect beef jerky marinade is a little salty and a little sweet. In this recipe, fresh lime gives a ton of flavor and chili bring a soft heat. Perfection!
Limes-Fresh limes are key- you need the zest and the juice to get the perfect tang.
Soy Sauce- We use tamari in place of soy sauce but feel free to substitute coconut aminos if you are avoiding soy. If using coconut aminos, give the marinade a taste as it may need a pinch of additional salt to help the meat cure and get that perfect salty flavor.
Chili Garlic Paste- Below is the chili sauce I use. I prefer it because it has no added sugar and plenty of garlic. In a pinch I have substituted the same amount of Sambal sauce or siracha sauce plus 4 cloves of sliced garlic.
I found this chili sauce to be mild to medium with a little sweetness so feel free to amp it up with an extra sliced Thai chili if you are a spice monger (like Mr. Peel).
Worcestershire Sauce- This adds an umami flavor to the beef jerky. You can also substitute fish sauce for Thai inspired beef jerky.
Honey-A little honey goes a long way, you can always add more next time if you prefer a sweet flavor. If you are vegan substitute maple syrup. JUST KIDDING… it is beef jerky!

You have the perfect Chili Lime Beef Jerky Marinade, now what?
Cutting and Marinating the Beef
I typically use a bottom round roast. Slightly frozen beef is ideal for cutting. You can freeze it for an hour before you start.
Cut into ¼ inch slices against the grain. Depending on your cut you may end up with long pieces or short chip-like pieces. Both work. But most likely you will have a mix of both. Don't worry about it, it is beef jerky not a beauty contest.
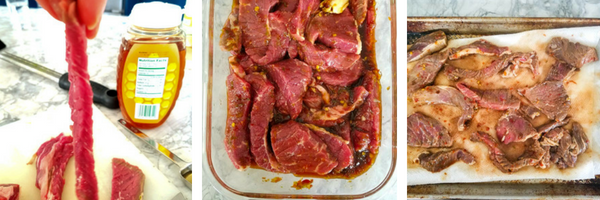
Marinade the beef for 24 hours in a glass container. Be sure to give the mixture a good shake every now and then to ensure that every piece is completely coated with your chili-lime marinade.
Drain the marinade from the beef and pat it dry.
How to Make Beef Jerky in Your Oven
OK now for the fun part!!!! I am so excited about this awesome beef jerky hack. Hunt down a few bamboo skewers. Skewer the beef, keeping each piece separated by an inch or so.
I am using 8-inch bamboo skewers, but since then I have found reusable metal ones. I think they are for trussing a turkey or roast but they work for this too!
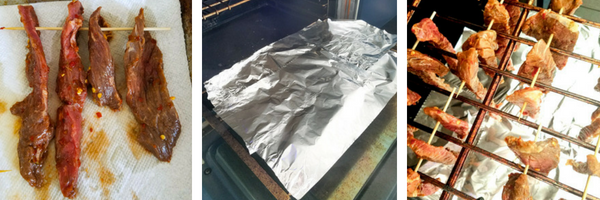
You will need two oven racks. Line the bottom rack with foil (you will thank me later for this!) and place the second rack at least 8 inches above the bottom rack. Preheat the oven to 200 degrees.
Place the skewers onto the top oven rack, allowing the beef strips to hang down below the rack with lots of space in between so each beef jerky piece receives air circulation. CLOSE the door and bake for 15 minutes.
After 15 minutes, turn the oven down to 165 degrees (or lower if your oven goes down that far) and crack the door open with a wooden spoon.
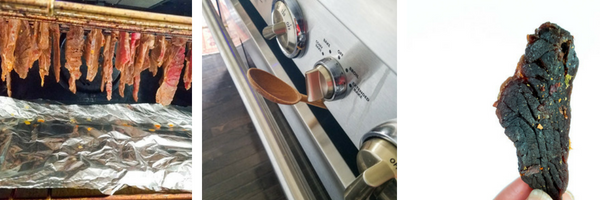
Now we wait. The drying time for beef jerky in your oven is the same as a dehydrator. It depends a lot on the humidity and how thick the beef slices are. It takes anywhere from 4 to 8 hours for this chili lime beef jerky to cure.
Can't wait 4 hours for the perfect snack? Give this Strawberry Tahini Shake a try, it is dairy and sugar free. It should hold you over until the oven dried beef jerky is done. Speaking of which....
Beef jerky is done when it cracks when bent but isn't so brittle it breaks. Much of the doneness is a matter of preference. I typically check progress at 3 ½ hours and then every 30 to 45 minutes after that.
Expert Tip
if you are unsure about when the beef jerky is done, pull out one skewer and allow it to cool for 10 minutes. If you like the texture you are done, if not pop it back in for 30 minutes and retest.
More Snack Recipes


🌡️Storing Leftovers
Allow the beef jerky to cool and remove it from the skewers. I keep ours wrapped in the fridge (mostly because Ohio summers are HUMID).
But this chili lime beef jerky travels great so don't worry about keeping it cold. It will last a week properly wrapped in the pantry or two weeks in the fridge. See below for longer-term storage options.
Did you enjoy making this recipe? Show it some love with ⭐⭐⭐⭐⭐ and leave a comment! Hungry for more? Get more flavorful recipes!
📖 Recipe Card
Chili Lime Beef Jerky
Ingredients
- 2 lbs beef roast london broil, round roast etc
- 2 limes, zested & juiced
- ⅓ cup tamari gluten free soy sauce
- ⅓ cup chili garlic paste
- 2 Tablespoon worcestershire sauce
- 2 Tablespoon honey optional
Special Equipment
- Bamboo Skewers
Instructions
- Trim excess fat from the roast and thinly slice against the grain into ¼ inch slices. Place in a glass bowl. Whisk together remaining ingredients and pour over the beef ensure every piece is totally covered. Marinade overnight, stirring the bowl ever few hours to ensure even coating.2 lbs beef roast, 2 limes, zested & juiced, ⅓ cup tamari gluten free soy sauce, ⅓ cup chili garlic paste, 2 Tablespoon worcestershire sauce, 2 Tablespoon honey
- Preheat over to 200 degrees. Place foil on the bottom rack to catch drips. Remove the beef from the marinade and dry off the pieces. Skewer one end of each strip, place the pieces one inch apart on the skewer. Place skewers directly on the top oven racks, allowing the beef strips to hang down.Bamboo Skewers
- Bake for 15 minutes with the door closed. After 15 minutes, prop the door open with a wooden spoon and drop the oven temperature to 150 degrees. Cook for 4 to 6 hours, testing every 30 minutes. The jerky is done when it cracks went bent.
Video
Notes
- To make jerky in a dehydrator, layout on a tray with plenty of peace in between pieces. Turn your dehydrator to jerky and follow the oven instructions for testing your beef jerky.
- If you are unsure if the jerky is done, keep in on the skewers until cool. Test a piece, it should crack and slowly bend. If it still is too chewy feeling, pop the skewers back into the oven.
- Beef jerky will last for 2 weeks in a ziploc bag in the fridge. Or a week in the pantry.
- For longer-term storage place jerky in a vacuum seal bag. Freeze for 3 to 6 months. Thaw in the fridge and consume within one week of opening.
Whitney says
We love the flavor of this jerky! I make it in a dehydrator and have a hard time keeping it from going oily. I might try blotting the jerky every hour?
Jen Wooster says
I blot it dry before putting it in the dehydrator. Also try using a very lean cut of beef.
Angela says
I love all of the ingredients in the marinade. What a great combination. And so easily done in the oven!
Jovita says
I have never tried making beef jerky at home but after reading your post I am thinking about it. Looks so delicious!
Julia says
Looks delicious! And I love the fact that I don’t need a dehydrator to make it!
Jen says
It is just as good oven-dried so why buy extra equipment!
Alison says
Sounds so flavorful. A great snack to bring along for hikes and bike rides this summer!
Charla says
I love to snack on beefy jerky. It's my post workout snack, never tried this flavour but willing to. Thank you!
Amy says
I love this beef jerky recipe that can be done without a dehydrator. I also like that you are trying to heal your bodies with food. What we eat really does make a difference. It is challenging but hopefully worth it. I found you on Everything Foodies Pinterest. Thank you for sharing. I look forward to following you on your journey to healthiness.
Jen says
Thanks so much for checking us out!